Review on Motherboard AsRock H570 PHANTOM GAMING 4
4 min readI thought about updating my computer, used for everything, and playing, and surfing the Internet, and video encoding, and so on. In this case, it happens that you need to perform several tasks at the same time. The previous processor was the eighth generation i7. It so happened that I sold it along with the motherboard and began to select a new configuration. And just INTEL released the next, eleventh generation of processors, the choice became obvious, the new Core i7 11700 CPU, and accordingly a new motherboard is needed. Having studied the specifications of the new chipsets, I decided that it would be either H570 or Z570, since only these two chipsets have some new chips, their junior chipsets deprived. But motherboards on the Z chipset cost quite inhumane money, so I opted for the H chipset. And already from motherboards on the H570 chipset I chose this option from AsRock, the Phantom Gaming 4 model. This motherboard had everything I needed. There is a decent power circuit with heatsinks and all the necessary connectors. This is the motherboard I bought.
 - image 1")
Brief characteristics:
- Socket: LGA 1200
- Supported processors: 10th and 11th generation
- Chipset: Intel H570
- SLI / CrossFire Support: CrossFire X
- Memory: DDR4 4 slots in dual channel mode
- Maximum memory capacity: 128GB
- SATA: SATA 6Gb / s 6 pieces
- Number of M.2 slots: 4 pieces
- Expansion slots: 2xPCI-E x16, 3xPCI-E x1
- Sound: Realtek ALC897
- Ethernet: Intel I219V
- Main power connector: 24-pin
- CPU power connector: 8-pin + 4-pin
- Form Factor: ATX
- RGB tape connector: yes
So, this motherboard comes in such a colorful box.
 - image 2")
The reverse side shows various features of this motherboard, such as a USB 3.2 Gen 2 front panel, an M.2 connector for a WiFi module, a Hyper M.2 connector for an SSD, a network card based on an INTEL chip and support for RGB strips.
 - image 3")
We open the box, we see the delivery set.
 - image 4")
We see the back cover of the input and output ports.
 - picture 5")
Two SATA cables.
 - image 6")
Four screws for fastening M.2 devices.
 - image 7")
Manual.
 - image 8")
Disk with drivers and utilities.
 - image 9")
Well, let’s move on to the board itself. The board is made on black PCB, the soldering is neat, the flux is washed, the components are soldered exactly.
 - picture 10")
Rear I/O panel. Here we see PS/2 keyboard / mouse, HDMI, Display Port, USB 3.0, USB Type-C, network jack and audio jacks.
 - image 11")
The power circuit of this motherboard is quite good, besides, there are radiators to remove heat from the transistors, I did not like that the radiators are fixed on plastic clips. Power connector 8 + 4 pins.
 - picture 12")
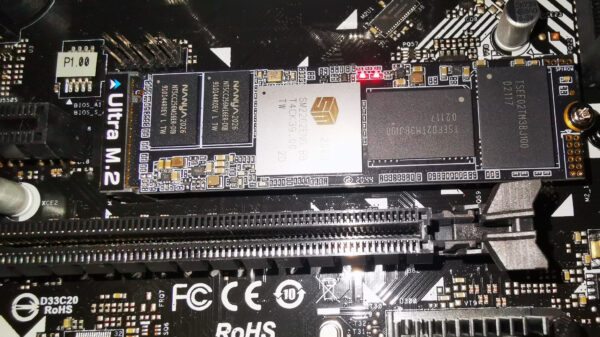
Below the processor socket we see a scattering of connectors, four M.2 connectors, one high-speed Hyper M.2 for fast SSDs working directly with the processor, only with the eleventh generation, two Ultra M2 connectors and one WiFi M.2, respectively for the WiFi module. We also have two PCI-E x16 connectors, the board supports CrossFire. And three PCI-E x1 slots. Below there are pads for connecting USB 2.0 on the front panel, an audio jack, connection of buttons and indicators.
 - picture 13")
There are four slots for RAM, next to it we see a 24-pin power supply connector, two USB 3.0 pads for the front panel of the case, one USB 3.2 Gen 2, six SATA ports. Also a tiny heatsink for the H570 chipset.
 - picture 14")
View of the SATA ports, all directed parallel to the board, we can also see the USB connectors, one 3.0 is also directed parallel to the board.
 - picture 15")
And we assemble the system, install the RAM, we have four strips of eight gigabytes, as well as a solid-state drive from INTEL.
 - picture 16")
And of course the processor. Core i7 11700.
 - picture 17")
We turn it on, the system started immediately, without any problems, let’s look at the BIOS of this board. This is the window that meets us. Here is the basic information about the system, the BIOS out of the box P1.30, the latest P1.70 was flashed.
 - picture 18")
The translation could of course be better. Below is the fan setting. There are enough connectors on the board.
 - picture 19")
We go to the advanced mode, the first page is the main one.
 - picture 20")
Next is the overclocking tab.
 - picture 21")
Followed by advanced settings.
 - picture 22")
Further utilities.
 - picture 23")
System monitoring.
 - picture 24")
Setting up the fans again.
 - picture 25")
 - picture 26")
Safety
 - picture 27")
System boot options.
 - picture 28")
Section exit.
 - picture 29")
Information about the motherboard through the CPU-Z program.
 - picture 30")
Information about the processor.
 - picture 31")
RAM 32 GB.
 - picture 32")
Let’s look at the sensors available on this board through the AIDA 64 program. The program does not correctly see this board.
 - picture 33")
Next is the data from the sensors in the load on the processor.
 - picture 34")
Then we go to the BIOS and remove the restriction from the processor thermal package and run the stress test. We get the following results.
 - picture 35")
And a couple of CPU benchmarks. Built-in WinRar benchmark.
 - picture 36")
Super PI.
 - picture 37")
I would like to finish a small review, which I did not like, translation into BIOS. In all other respects, everything is fine, including the quality of the assembly of the elements, the processor power circuit, the number of different connectors. CrossFire support for someone.
The article is written on the basis of materials of this site.